Note: Still playing catch-up with the blog, so a lot of the posts you'll be seeing for the next few weeks are from last year. Thanks.
Back in December I ended the brewing hiatus and did something I usually don't - a "normal" beer, low in alcohol, without the expense and time commitment of the barrel aged and sour beers I usually brew.
This time the idea was to take the flavors of a traditional dry stout, but replace a portion of the bitterness with cranberries - if done right, I felt the bitter, astringent, slightly sour flavor would lend itself well to the style. I set out to craft a recipe that would work with this in mind - backing up off the roasted malts a bit, as well as the IBUs.
For the cranberries I decided to use a 12 ounce bag of fresh cranberries, dumped straight into the boil with about 15 minutes left. In theory this was a great idea, but unfortunately, it also clogged the ball valve like you wouldn't believe - I ended up having to siphon the beer out manually.
I added another 32 ounces of unprocessed, unfiltered cranberry juice to the primary along with enough water to top it off to 5 gallons, as I had boiled off more water than I planned. Fermentation went off without a hitch - afterwards I bumped the temp up into the upper 60's and conditioned it in primary for about 6 weeks. Final gravity came out at 1.011, which puts this right at 7% - higher than I'd wanted but still drinkable, especially compared to the quad I will be brewing next for QuadFest '14.
Recipe and some more photos after the break.

Friday, March 14, 2014
Thursday, March 13, 2014
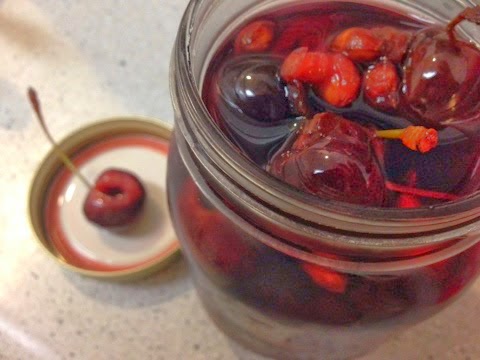
How To: DIY Maraschino Cherries
Note: Long time, no see - I'm playing catch-up with the blog, so a lot of the posts you'll be seeing for the next few weeks are from last year. Thanks.
Lately I've been on a bit of a Manhattan kick - they might just be my favorite cocktail (but it has to be with rye - as much as I love bourbon the flavors just don't meld as well, in my opinion).
 So, TLDR, get some fresh, pitted cherries, and throw them in a jar with some maraschino liqueur - can't be too hard, right? Unfortunately, I had this brilliant idea in December when cherry season was decidedly over. Luckily, one of the higher-end supermarkets was still carrying fresh bing cherries. I pitted them myself, leaving the stems on (for the cool factor) as well as reserved the pits for the jar - much like when making Kriek, it's the pits that give you all the delicious nutty flavors (ever wonder why we put almond extract in cherry pie? Yep.). As for the liqueur, any brand will do, but the most popular/readily available seems to be Luxardo.
Lately I've been on a bit of a Manhattan kick - they might just be my favorite cocktail (but it has to be with rye - as much as I love bourbon the flavors just don't meld as well, in my opinion).
I always try and use the best (within reason!) ingredients I can, whether it's cooking, brewing, or anything inbetween. Finding good rye whisky is easy. Finding good vermouth is a little harder, but nothing a trip to Total Wine can't fix. But good maraschino cherries? That's tricky. The bright red ones you see all over aren't really anything like the real thing - they don't taste like cherries either. I've tried some of the higher quality ones, but they all miss the mark - too sour, too vegetal, too... weird. So I gave up and decided to make my own.
Doing some research I learned that maraschino cherries are actually named after the liqueur (which itself is named after the variety of cherries it is flavored with, Marasca cherries). In ye olden days, they were made by soaking fresh cherries in maraschino liqueur and a heavy dose of table sugar. At some point, they mutated into the bright red, flavorless contraptions hoisted on you at the local Denny's.
 So, TLDR, get some fresh, pitted cherries, and throw them in a jar with some maraschino liqueur - can't be too hard, right? Unfortunately, I had this brilliant idea in December when cherry season was decidedly over. Luckily, one of the higher-end supermarkets was still carrying fresh bing cherries. I pitted them myself, leaving the stems on (for the cool factor) as well as reserved the pits for the jar - much like when making Kriek, it's the pits that give you all the delicious nutty flavors (ever wonder why we put almond extract in cherry pie? Yep.). As for the liqueur, any brand will do, but the most popular/readily available seems to be Luxardo.
I placed as many cherries as would fit, pits, and about 1/2 cup of granulated sugar in a mason jar and then filled it to the brim with the maraschino liqueur. After about a week they looked 'done' to me, although at 60 proof I doubt they will really ever go bad.
 |
| Delicious! |
Monday, September 2, 2013
Hop Harvest 2013, Part III - The Fashionably Late Edition
 A while back I detailed my journey with harvesting, drying, and storing this year's crop, as well some making a wet-hopped IPA. Well, my hops plants decided that they weren't quite done producing, which led to a second yield. I didn't take any pictures of the bagging process, but I ended up with another 6 ounces of dried hops, bringing my 2013 total up past a pound(!).
 |
| They call these "Angel Hops". Because the leaves look like wings. |
Monday, August 12, 2013
Wet-hopped IPA & Hop Harvest 2013, Part II - Drying, hopping, and the review

After all was said and done after the brew day, I still had a little over half of the Cascade plant to harvest. Knowing I'd need more fresh hops for the beer once it was done fermenting, I held off on taking any more off the plant, especially as I was quickly losing sunlight. Three days after I had brewed, it was time to bag the first round of dried hops - in our climate (hot and dry) it only takes ~48 hours to dry hops to a state where they are considered shelf stable. Hops lose as much as 80% of their weight when dried, which is also why you need so many wet hops for a harvest ale. Note: I bag my hops in 1 ounce increments, as I've found that to be the best size for freezing while not being a huge bag (whole cones take up a lot more room than pellets).

 After drying the hops, I ended up waiting almost two weeks before I was finally able to begin harvesting the remaining hops on the plant - or so I thought. In the span of a couple of weeks the Cascade plant had sent out additional side-shoots and was already producing a second round of hop burrs, the stage that precedes the cone flower. I'll need to harvest a third round of hops in early September, most likely. Anyway...
I spent the good part of an hour picking cones from the plant, reserving 8 ounces for wet-hopping the fully fermented IPA. After shaking the leaves/bugs/dirt loose, I gave them a quick rinse in StarSan to make sure I didn't introduce any bacteria or wild yeast to the finished beer. After wet-hopping the IPA, I set the rest of the hops onto the drying screen, just as I had two weeks earlier.
Friday, August 2, 2013
In the Garden 2013: Photos
Not much to write today, enjoy some of the latest photos from the garden.
 |
| Some san marzano tomatoes. |
 |
| Pinot gris grapes nearly ready for picking. |
 |
| Trinidad Moruga Scorpion -the world's hottest pepper. |
Hops Harvesting 101: Tips 'n Tricks
I've had a lot of people asking me recently about what how I go about growing/harvesting/storing hops, so I thought I'd make a post about my processes to help others out.
I've only been growing hops for two years, so I won't profess to be some sort of genius - at the end of the day, hops are still plants, and standard garden knowledge still applies. That being said...
I've only been growing hops for two years, so I won't profess to be some sort of genius - at the end of the day, hops are still plants, and standard garden knowledge still applies. That being said...
Wet-hopped IPA & Hop Harvest 2013, Part I
Note: Because this post will cover a brew day and hop harvesting, I've decided to split it into two parts.
Last year I brewed the harvest ale from hell - this year, I wanted to learn from those mistakes and do it the right way. Ordinarily, you'd be seeing this post next month, but my second year hop plants have been going nuts this summer. So crazy, in fact, that I had hops ready to harvest in mid-July - compared to early August last year.
So two weeks ago, I sought out to make a beer with all the hop cones that were ripening on the bines.
My intent last year with the harvest ale was a wet-hopped pale ale, with tons of fresh hops in the boil and post-fermentation. Timing didn't quite work out, however, as the grain I wanted to use - grown and malted right here in town - wasn't ready at the same time as my hops. In the end, I had to dry them, freeze them, and use them much later in the year. This year, I was able to brew another local beer, but with the abundance of hops, I stepped it up and made an IPA.
Last year I brewed the harvest ale from hell - this year, I wanted to learn from those mistakes and do it the right way. Ordinarily, you'd be seeing this post next month, but my second year hop plants have been going nuts this summer. So crazy, in fact, that I had hops ready to harvest in mid-July - compared to early August last year.
So two weeks ago, I sought out to make a beer with all the hop cones that were ripening on the bines.
 |
| Hops! |
Subscribe to:
Posts (Atom)