Wednesday, December 24, 2014

Hop Randall Build

Last weekend I built a hop randall, something I have been wanting to do for a long time. For those who are unfamiliar with the name, a randall, also known as a moorminator, hash back, or beer infuser, is a device that is placed inline between a keg and a draft faucet that allows you to infuse additional flavors into a beer. There are several designs, ranging from cheap - a French Press or a thermos with a filter - all the way up to the overkill solution offered by Dogfish Head.

I opted to go for the tried and true water filter based design, as it seems to be the most prevalent and is relatively cheap to build yourself - there are pre-built models available from several homebrewing sites as well as places like Amazon and eBay for about $100, but you can build one yourself much cheaper.

I opted to go for an all-stainless (save the filter housing) design, because stainless. Many of these parts are available in brass/plastic (nylon or PVC) versions as well for less. The design I chose uses a Ball Lock post on one side and a disconnect on the other so I can easily daisy-chain the Randall into my system without having to mess with anything, but there are other options as well if you look around.

Check out the build after the break.

Friday, December 19, 2014

Girl Stout Cookie - Samoa

A few weeks back I read about a brewery in San Francisco that brewed several beers inspired by girl scout cookies for SFBW. My wife and I love Samoas, and so the idea was born to brew my own cookie-inspired beer.

After settling on the general profile and base style of the beer, a recipe quickly came together for a lightly hopped oatmeal stout, with generous amounts of chocolate and crystal malts, to which lactose, caramelized sugar, toasted coconut, cocoa nibs/powder, and vanilla beans would be added for the quintessential flavors of a Samoa cookie.

The lactose and cocoa powder were added with about 10 minutes left in the boil, while the coconut, nibs, and vanilla beans will be added to secondary.

Enjoy some more photos from the brew day - and the recipe - after the break.

PS: Thanks to NOLA Brewing for such a clever name - I had to use it!

Thursday, December 18, 2014

Tropical Rye IPA


Last month I brewed a tribute to one of my favorite beers, Tropical Heat Ruination. I started with my go-to Rye IPA base, switching to more tropical-forward hops such as Mosaic and Simtra, as well as Gigayeast's Vermont IPA (Heady Topper) yeast. Then, as I tend to do, I dialed it up to 11 with 5 pounds of actual tropical fruit, as well as some pepper extract I made from splitting a few habaneros and ghost in half and soaking them in tequila - that way I could adjust to taste at kegging.
Very few roadbumps on this beer - a sign I may finally be getting dialed in at the house - although the beer did nearly explode. I had so many pellet hops in the fermenter that they actually clogged the blow-off tube and the entire assembly plus maybe 1/3 gallon of wort literally exploded out of the carboy and all over the interior of my fermentation chamber. After primary I dry-hopped with an additional 4 ounces of Citra and Mosaic.
 

Tuesday, December 9, 2014

Hot Sauce 101: Sriracha (El Gallo Fantasmo)

For the inaugural edition of Hot Sauce 101 I'll talk about one of my favorite hot sauces of all time, sriracha.

Born in Thailand, this bright red sauce has somehow become the hot new thing, supplanting bacon as the trendy thing to add from everything to potato chips to ice cream. Traditional sriracha (invented in Sri Racha, of course) is much sweeter and runnier than the Huy Fong version people in the US are accustomed to.

That being said, I'm a huge fan of the Americanized version, which is hotter, more garlicky, and overall denser flavor-wise. The only complaint I have, is the heat. I've been in search for a commercially produced version that ratchets the heat level up to 11, but so far I've only found one producer, and they only make the 'extra hot' version a couple of times a year.

Thankfully, making it isn't that hard.

1. Get some chilis (and garlic!):


In this case, a mix of fresno and Trinidad Moruga scorpion peppers, with a few dried ghost peppers for good measure.

Wednesday, November 5, 2014

Local Lambic 2013/2014 Updates

I recently bottled last year's Acai berry sour. The color is closer to orange/red than purple, which is odd as the juice was a very dark purple.

Unfortunately, I lost most of my photos when I upgraded to a new phone, so I've lost photos of the brewday for the 2014 edition of the local lambic brewed in August... so these pictures of the bottling day of the 2013 will have to make due.


Ready for racking.

Tuesday, September 30, 2014

Hiatus + Updates

I've been on a brewing hiatus since April but wanted to stop by and let everyone know I'm still around.

I've been busy with work, the house (we repainted the whole house top-to-bottom, replaced all of the doors, doorknobs, trim, upgraded all the lighting to LED and redid the front/back yards) and other projects.

I planned on posting updates on the house remodel and garden - in addition to the regular cooking/brewing posts - but all of the photos on my phone were nuked, so unfortunately you'll just have to use your imaginations.

Anyway, I brewed the 2014 iteration of the local Lambic two weeks ago (a bit late), so I should be back to posting about beer shortly.

Tuesday, March 25, 2014

Andouille Sausage 101

Everyone has a favorite dish. For me, it's gumbo, especially on a cold day. Gumbo isn't hard to make - it's basically a stew - but good gumbo is a different story. You need good technique, good equipment (especially a heavy cast iron skillet), and most importantly, good ingredients. For the most part, that means getting high quality protein (I prefer crawfish, shrimp, or chicken when I make gumbo), fresh vegetables, and good butter (I prefer cultured, grass fed butter when available). The last piece of the puzzle, and the one that has eluded me so far, is andouille. A spicy, coarsely ground pork sausage, when done right it's spicy, sweet, with a hint of garlic. When done bad, it's no better than dollar store kielbasa. It's not easy to find on the west coast, and the few brands that the local stores do offer are hardly authentic - collagen casings, chicken, beef, even soy-based - a far cry from the heavily seasoned pork-based sausage it mimics. A lot of recipes have admitted defeat, suggesting to use polska kielbasa or even italian sausage in lieu of andouille. But for me, no such shortcuts exist. With little option, I decided I would have to make my own...

Luckily, I had a new electric smoker that was begging to be used, and several resources on how to make it (relying heavily on this site). After several trips to the butcher and grocery stores to procure the necessary cuts of pork and casings - I could not find beef casings in the area and had to settle for hog, something I will address with the second batch - it was time to get to work.

I ground half of the pork shoulder/butt, and coarsely chopped the other half, to get the course texture I was looking for. Then I added the seasonings, pink salt, water and minced garlic. After that, it was time to stuff the mixture into the hog casings. (As a side note, I will have to invest in a much better stuffer in the future if I don't want to spend several hours stuffing.) After the first few links I got the hang of it - the trick is to move the casings slow enough to get them filled tightly, without rupturing them.

Once stuffed, the links were tied off and sent to the smoker. I used a mixture of cherry and peach wood, although I have read that pecanwood is the preferred choice for many (another thing to address next time!). I smoked the links for approximately 6 hours at 175, ramping the temperature to 225 for the last hour. Next time I may need to smoke them a bit longer as the smoke flavor was more subdued than I would have liked.

After cooling, I vacuum-sealed and froze most of it, but did manage to sneak in a batch of gumbo the next day. I have a few bugs to work out, this being my first batch of homemade sausage, but overall, well worth the effort and leaps and bounds above what you can buy. Finally, gumbo I can be proud of. Now if only I knew how to make tasso ham...

Enjoy some additional photos after the break.

Thursday, March 20, 2014

Local Lambic 2013: Açaí Berry Sour

For the last two years now I've been brewing a local 'lambic' - on Monday I posted an update on the 2012 batch; the 2013 batch has been in secondary for a little over a year now, so it was time to do something with it.

Much like last year, I planned to split the batch, fruiting most of it while reserving a portion for later blending. However, with nearly 5 gallons of beer this year (compared to 3.5) I still had quite a bit left over afterwards, so I decided to bottle it as straight lambic.

My philosophy with brewing is that I don't want to make something I can buy at the store (because what's the point?) so I always like to put a spin on beers. In the case of fruit lambics, it's using non-traditional fruits, especially fruits that would be cost-prohibitive on a commercial scale. As you might recall, last year the fruit of choice was one of my all-time favorites, boysenberries. This year, I settled on another fruit I enjoy, the much-hyped açaí berry. I was hoping to use frozen fresh berries, but given the limited areas in which they are grown that proved to be nearly impossible, so I had to settle for bottled puree - luckily almost every health store carries some form of this. Ignoring the health benefits of the fruit, I felt the berry and chocolate notes would pair well with a sour base beer. I will find out in about six months.

Until then, enjoy some photos from bottling day after the break.

Monday, March 17, 2014

Local Lambic 2012: Boysenberry'n it Up

Note: Still playing catch-up with the blog, so a lot of the posts you'll be seeing for the next few weeks are from last year. Thanks.

Back in April of 2012 I brewed the inaugural batch of local lambic - my take on the classic sours of Belgium, using a turbid mash, aged hops, and locally harvested yeast and bacteria.

The last update on this beer was back in February of last year, when I racked most of it onto boysenberry puree (and reserved a gallon for future use). After that, the beer fermented out and aged for another 10 months, finally getting bottled in December of last year.

I ended up getting almost a full case of 375mL bottles as well as a handful of larger 750mL ones. It will probably be another 6 months + before it's carbonated, but I'm very excited by how this beer has turned out. Stay tuned!

Saturday, March 15, 2014

In the Garden 2014: Hoppin' into action

Just a quick post this weekend, but with the warmer weather recently, the hops have awoken from their slumber and are, as expected, growing like crazy - all of the plants have started sprouting. Check it out (more photos after the break):

Cascade, of course. They do very well in this climate.

Friday, March 14, 2014

Cranberry Stout

Note: Still playing catch-up with the blog, so a lot of the posts you'll be seeing for the next few weeks are from last year. Thanks.

Back in December I ended the brewing hiatus and did something I usually don't - a "normal" beer, low in alcohol, without the expense and time commitment of the barrel aged and sour beers I usually brew.

This time the idea was to take the flavors of a traditional dry stout, but replace a portion of the bitterness with cranberries - if done right, I felt the bitter, astringent, slightly sour flavor would lend itself well to the style. I set out to craft a recipe that would work with this in mind - backing up off the roasted malts a bit, as well as the IBUs.

For the cranberries I decided to use a 12 ounce bag of fresh cranberries, dumped straight into the boil with about 15 minutes left. In theory this was a great idea, but unfortunately, it also clogged the ball valve like you wouldn't believe - I ended up having to siphon the beer out manually.

I added another 32 ounces of unprocessed, unfiltered cranberry juice to the primary along with enough water to top it off to 5 gallons, as I had boiled off more water than I planned. Fermentation went off without a hitch - afterwards I bumped the temp up into the upper 60's and conditioned it in primary for about 6 weeks. Final gravity came out at 1.011, which puts this right at 7% - higher than I'd wanted but still drinkable, especially compared to the quad I will be brewing next for QuadFest '14.

Recipe and some more photos after the break.

Thursday, March 13, 2014

How To: DIY Maraschino Cherries

Note: Long time, no see - I'm playing catch-up with the blog, so a lot of the posts you'll be seeing for the next few weeks are from last year. Thanks.

Lately I've been on a bit of a Manhattan kick - they might just be my favorite cocktail (but it has to be with rye - as much as I love bourbon the flavors just don't meld as well, in my opinion).
 
I always try and use the best (within reason!) ingredients I can, whether it's cooking, brewing, or anything inbetween. Finding good rye whisky is easy. Finding good vermouth is a little harder, but nothing a trip to Total Wine can't fix. But good maraschino cherries? That's tricky. The bright red ones you see all over aren't really anything like the real thing - they don't taste like cherries either. I've tried some of the higher quality ones, but they all miss the mark - too sour, too vegetal, too... weird. So I gave up and decided to make my own.
Doing some research I learned that maraschino cherries are actually named after the liqueur (which itself is named after the variety of cherries it is flavored with, Marasca cherries). In ye olden days, they were made by soaking fresh cherries in maraschino liqueur and a heavy dose of table sugar. At some point, they mutated into the bright red, flavorless contraptions hoisted on you at the local Denny's.
 
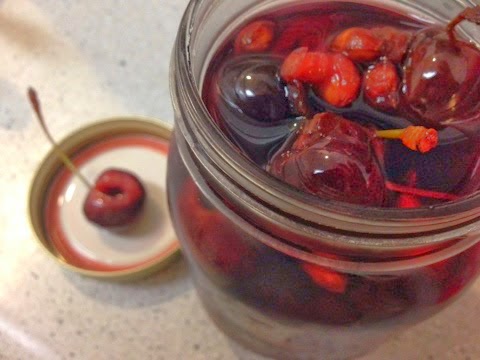
So, TLDR, get some fresh, pitted cherries, and throw them in a jar with some maraschino liqueur - can't be too hard, right? Unfortunately, I had this brilliant idea in December when cherry season was decidedly over. Luckily, one of the higher-end supermarkets was still carrying fresh bing cherries. I pitted them myself, leaving the stems on (for the cool factor) as well as reserved the pits for the jar - much like when making Kriek, it's the pits that give you all the delicious nutty flavors (ever wonder why we put almond extract in cherry pie? Yep.). As for the liqueur, any brand will do, but the most popular/readily available seems to be Luxardo.
I placed as many cherries as would fit, pits, and about 1/2 cup of granulated sugar in a mason jar and then filled it to the brim with the maraschino liqueur. After about a week they looked 'done' to me, although at 60 proof I doubt they will really ever go bad.
 
 
Delicious!

Monday, September 2, 2013

Hop Harvest 2013, Part III - The Fashionably Late Edition


A while back I detailed my journey with harvesting, drying, and storing this year's crop, as well some making a wet-hopped IPA. Well, my hops plants decided that they weren't quite done producing, which led to a second yield. I didn't take any pictures of the bagging process, but I ended up with another 6 ounces of dried hops, bringing my 2013 total up past a pound(!).
 

They call these "Angel Hops". Because the leaves look like wings.
 

Monday, August 12, 2013

Wet-hopped IPA & Hop Harvest 2013, Part II - Drying, hopping, and the review

Last week I posted Part I of the write-up on the wet-hopped IPA slash hop harvest, which covered the first round of harvesting and brewing the IPA. This week, I'm going to talk about more hop harvesting and drying/storing the hops, as well as play catch up on the IPA.

After all was said and done after the brew day, I still had a little over half of the Cascade plant to harvest. Knowing I'd need more fresh hops for the beer once it was done fermenting, I held off on taking any more off the plant, especially as I was quickly losing sunlight. Three days after I had brewed, it was time to bag the first round of dried hops - in our climate (hot and dry) it only takes ~48 hours to dry hops to a state where they are considered shelf stable. Hops lose as much as 80% of their weight when dried, which is also why you need so many wet hops for a harvest ale. Note: I bag my hops in 1 ounce increments, as I've found that to be the best size for freezing while not being a huge bag (whole cones take up a lot more room than pellets).

After drying the hops, I ended up waiting almost two weeks before I was finally able to begin harvesting the remaining hops on the plant - or so I thought. In the span of a couple of weeks the Cascade plant had sent out additional side-shoots and was already producing a second round of hop burrs, the stage that precedes the cone flower. I'll need to harvest a third round of hops in early September, most likely. Anyway...  
 
I spent the good part of an hour picking cones from the plant, reserving 8 ounces for wet-hopping the fully fermented IPA. After shaking the leaves/bugs/dirt loose, I gave them a quick rinse in StarSan to make sure I didn't introduce any bacteria or wild yeast to the finished beer. After wet-hopping the IPA, I set the rest of the hops onto the drying screen, just as I had two weeks earlier.


Friday, August 2, 2013

In the Garden 2013: Photos

Not much to write today, enjoy some of the latest photos from the garden.
 
Some san marzano tomatoes.
Pinot gris grapes nearly ready for picking.
Trinidad Moruga Scorpion -the world's hottest pepper.

Hops Harvesting 101: Tips 'n Tricks

I've had a lot of people asking me recently about what how I go about growing/harvesting/storing hops, so I thought I'd make a post about my processes to help others out.

I've only been growing hops for two years, so I won't profess to be some sort of genius - at the end of the day, hops are still plants, and standard garden knowledge still applies. That being said...

Wet-hopped IPA & Hop Harvest 2013, Part I

Note: Because this post will cover a brew day and hop harvesting, I've decided to split it into two parts.

Last year I brewed the harvest ale from hell - this year, I wanted to learn from those mistakes and do it the right way. Ordinarily, you'd be seeing this post next month, but my second year hop plants have been going nuts this summer. So crazy, in fact, that I had hops ready to harvest in mid-July - compared to early August last year.

So two weeks ago, I sought out to make a beer with all the hop cones that were ripening on the bines.
Hops!
 My intent last year with the harvest ale was a wet-hopped pale ale, with tons of fresh hops in the boil and post-fermentation. Timing didn't quite work out, however, as the grain I wanted to use - grown and malted right here in town - wasn't ready at the same time as my hops. In the end, I had to dry them, freeze them, and use them much later in the year. This year, I was able to brew another local beer, but with the abundance of hops, I stepped it up and made an IPA.

Wednesday, July 31, 2013

Garden '13 update


It's been a long time since I've posted, but I thought I'd play catch-up on the garden. Things have exploded - cherries, strawberries, raspberries, grapes, and tons of pepper/tomato plant growth. Pictures speak louder than words, so enough talking. On to the pictures!


Corn!
A few ears starting to develop.
Kaleidoscope peppers.
Tomatillo plant.

Raspberries ripening.

Pinot gris grapes. I also have a cabernet savignon plant that's got some bunches, but the gerwurztriminer plant seems to have stalled out.

Tuesday, June 11, 2013

Update 2: Brandy Barrel Quad


Available in 4 convenient sizes (actually 5, if you count the 12oz bottles).
It's been a little over a month since I restarted the stuck quad with a gigantic starter of WLP099. That seemed to have worked better than expected, as the quad dropped down to 1.018 before stopping for good. That put the quad at a hair over 15%, which makes this, by far, the biggest beer I've ever brewed.

After reaching terminal gravity it was time to transfer the quad into the brandy barrel I've been holding onto since January. It started life as a 20 liter Balcones distillery bourbon barrel that was used for a RIS and then refilled with a gallon of brandy. The beer spent 6 days in the barrel, coming out quite with a noticeable alcohol heat and some heavy oak tannins. (Fun fact: the residual CO2 will push beer through the spaces between the staves, and come out the other side of the barrel as sweet, oaky 'sap'.)

I then cold-conditioned the beer at 60 degrees for another 10 days. In just that short amount of time the oak and brandy flavors are already integrating into the beer nicely - I can't wait to try it five months from now.

I bottled the 4.5 gallons that remained on Sunday night (having lost some to evaporation and trub) into a mixture of bottles. Personally, I'm not fond of super-dry beers with a heavy oak presence, so in addition to the priming sugar I added 4 ounces of maltodextrin to add back some of the body that the super yeast ate. Eight bottles got the VIP treatment - corks, cages, foil, and labels - while the remainder went into a myriad of sizes of capped bottles for competitions, personal consumption, homebrew meetings, and etcetera.


More pictures after the break.

Friday, May 31, 2013

In the Garden: Memorial Day Weekend edition

Memorial Day weekend is always fairly relaxed in our family. This year, I spend a majority of it tending the garden. The pepper plants I bought down in San Diego are chugging along, and I can't wait to taste the fiery death each plant will give me - Trinidad Moruga Scorpion, Carolina Reaper, and a Chocolate 7 Pot, the 3 hottest chili plants in the world (for now).


The hops are doing extremely well - in fact, I'm already getting burrs, which means I may be harvesting my first round of cones sometime in July. Other than that, not a lot of homebrew news to report - the quad is in the barrel and the sours I brewed last year are almost ready to bottle.
I spent all day Sunday smoking a tri-tip and pork shoulder, along with a couple habaneros that I intend to dry and make into smoked habanero powder for seasonings.
 
Look at that smoke ring!