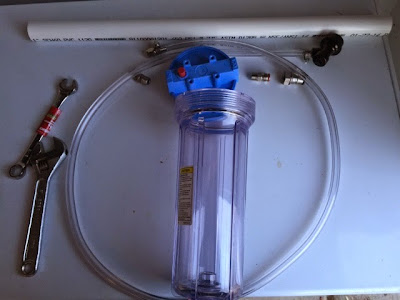
 Last weekend I built a hop randall, something I have been wanting to do for a long time. For those who are unfamiliar with the name, a randall, also known as a moorminator, hash back, or beer infuser, is a device that is placed inline between a keg and a draft faucet that allows you to infuse additional flavors into a beer. There are several designs, ranging from cheap - a French Press or a thermos with a filter - all the way up to the overkill solution offered by Dogfish Head.
I opted to go for the tried and true water filter based design, as it seems to be the most prevalent and is relatively cheap to build yourself - there are pre-built models available from several homebrewing sites as well as places like Amazon and eBay for about $100, but you can build one yourself much cheaper.
I opted to go for an all-stainless (save the filter housing) design, because stainless. Many of these parts are available in brass/plastic (nylon or PVC) versions as well for less. The design I chose uses a Ball Lock post on one side and a disconnect on the other so I can easily daisy-chain the Randall into my system without having to mess with anything, but there are other options as well if you look around.
Check out the build after the break.
Here is the full parts list that I used:
 |
| All the parts and tools you (should) need. |
- Pentek #10 Clear Filter Housing, model #158117, $16 @ Amazon - this one already has 1/4" threads so you will not need step-down adapter rings
- 1/4" NPT to 19/32" post adapter - $5 @ Williams Brewing
- 19/32" Ball Lock post/poppet - $10 @ my LHBS
- 1/4" NPT to 1/4" MFL adapter (stainless) - $3 @ Williams Brewing
- 1/4" FFL to 1/4" barb adapter (stainless) - $4, if I did this over again I would opt for the elbow version here
- 6' of 3/16" liquid beverage tubing - $3 @ Williams Brewing
- 1/4" barb liquid Ball Lock disconnect - $5 @ Williams Brewing
- 10" stainless steel pipe (Sanke spear) - FREE*
- two 1/4" tubing stainless worm-drive hose clamps - $1
Total: $47
Assembly is fairly straight-forward - wrap the the NPT/flare adapter in some Teflon, then screw it and the flare to barb adapter into the IN port of the filter housing, then mount the beverage tubing and Ball Lock disconnect onto the barb. I used a straight barb, but if I did it over again I would suggest using an elbow fitting, as this puts the tubing assembly at a more manageable angle when attempting to fit it into a tight space (light inside a kegerator).
Then, thread the NPT to post adapter (again, use Teflon tape) onto the OUT side of the housing, then screw the ball lock post down onto the adapter (make sure the poppet and o-ring are in place, you do not need Teflon for this connection as the o-ring on the adapter will provide the seal).
Finally, find a suitable pipe with 1/2" ID - a cut-down spear from a Sanke keg works perfectly. I was in a time-crunch to get the Randall working for a party so I am temporarily using a CPVC pipe as they are much easier to cut/drill, but will quickly be replacing it.
 |
| Drilling holes into the 'filter'. |
You will want to cut the pipe down to fit exactly where the water filter normally would - if you use the same filter I did this should be roughly 9-7/8". Deburr/clean up the ends after cutting. Then, drill several small holes (I used the smallest drill-bit I had, these holes are you filter - if you go too large you run the risk of clogging the Randall) in the bottom 2-3" of the pipe. The idea is that the beer will flow down into the housing, past the hops/coffee beans/whatever before going through these holes and back out the housing. Again, clean up the holes after drilling - you don't want plastic/metal bits getting into your lines/glass!
To use, stuff whatever ingredient you chose (in my case, whole leaf Cascade hops from my garden) evenly around the pipe and then assemble your Randall. I spray the entire thing down with Star-San before use to help maintain sanitation.
 |
| In the keg, stuffed with hops, and in use. |

No comments:
Post a Comment